Spring5
代码以及配套资料下载地址 点我,密码 ==> long
本章内容介绍
- Spring 框架概述
- IOC 容器
- IOC 底层原理
- IOC 接口(BeanFactory)
- IOC 操作 Bean 管理(基于 xml)
- IOC 操作 Bean 管理(基于注解)
- Aop
- JdbcTemplate
- 事务管理
- Spring5 新特性
Spring5框架概述
- Spring 是轻量级的开源的 JavaEE 框架
- Spring 可以解决企业应用开发的复杂性
- Spring 有两个核心部分:IOC 和 Aop
- IOC:控制反转,把创建对象过程交给 Spring 进行管理
- Aop:面向切面,不修改源代码进行功能增强
- Spring 特点
- 方便解耦,简化开发
- Aop 编程支持
- 方便程序测试
- 方便和其他框架进行整合(Junit,MyBatis…..)
- 方便进行事务操作
- 降低 API 开发难度
Spring5入门案例
- IDE:IDEA 2021.3
- JDK:jdk8+
- 构建工具:Maven(目前可有可无)
- 数据库版本:8.0.28
- Spring版本:5.3.9
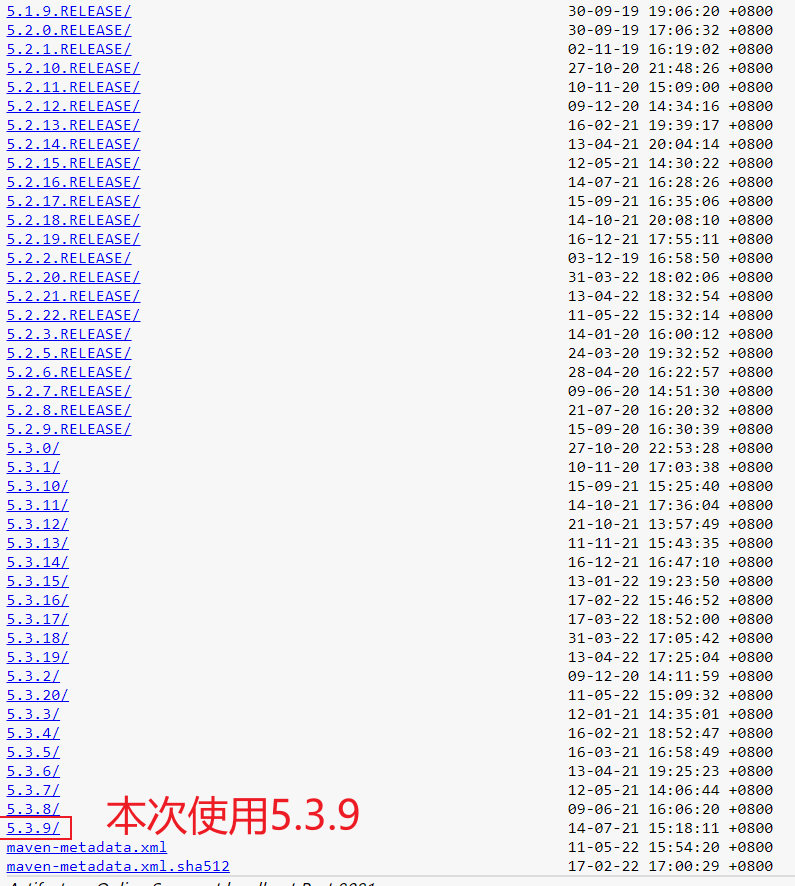
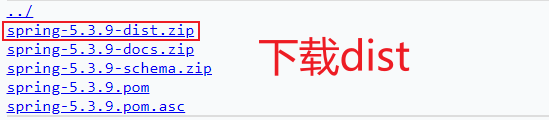
下载Spring5的jar包
下载地址:repo.spring.io
不想下载的可以来这里下载:
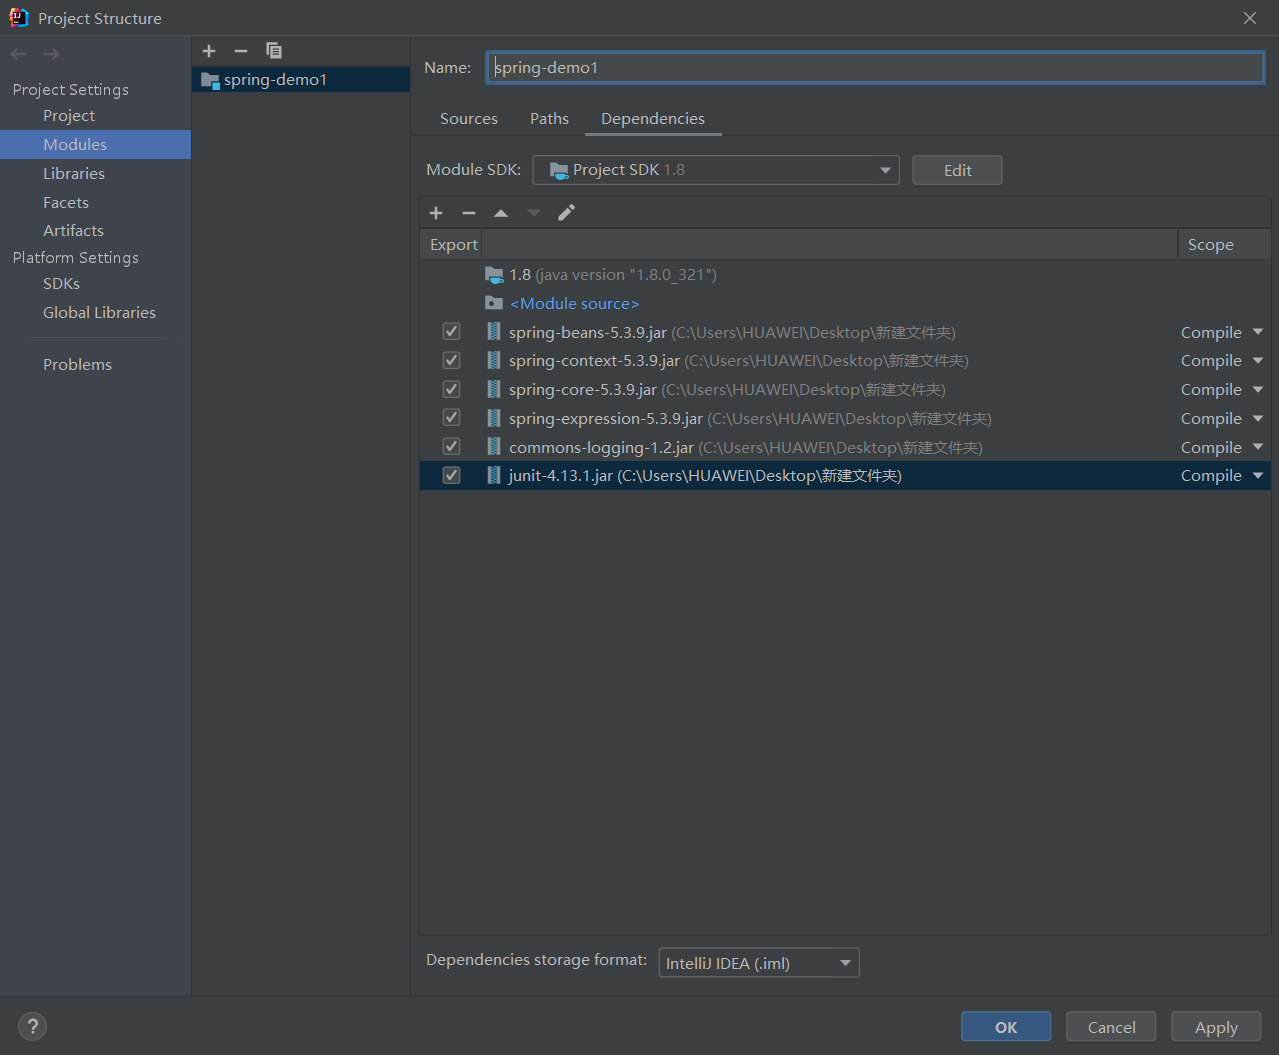
创建一个普通Java工程
导入相关jar包

创建一个User类
1
2
3
4
5
6
7
| package com.along;
public class User {
public void add() {
System.out.println("Add.....");
}
}
|
创建 Spring 配置文件,在配置文件配置创建的对象
在src目录下创建bean1.xml
1
2
3
4
5
6
7
| <?xml version="1.0" encoding="UTF-8"?>
<beans xmlns="http://www.springframework.org/schema/beans"
xmlns:xsi="http://www.w3.org/2001/XMLSchema-instance"
xsi:schemaLocation="http://www.springframework.org/schema/beans http://www.springframework.org/schema/beans/spring-beans.xsd">
<bean id="user" class="com.along.User"/>
</beans>
|
进行测试代码编写
使用Junit框架进行测试
创建一个测试包 test
创建TestSpring.java文件
1
2
3
4
5
6
7
8
9
10
11
| public class TestSpring5 {
@Test
public void testAdd(){
ApplicationContext context = new ClassPathXmlApplicationContext("bean1.xml");
User user = context.getBean("user", User.class);
System.out.println(user);
user.add();
}
}
|
运行代码 –> 结果:
com.along.User@8646db9
Add…..
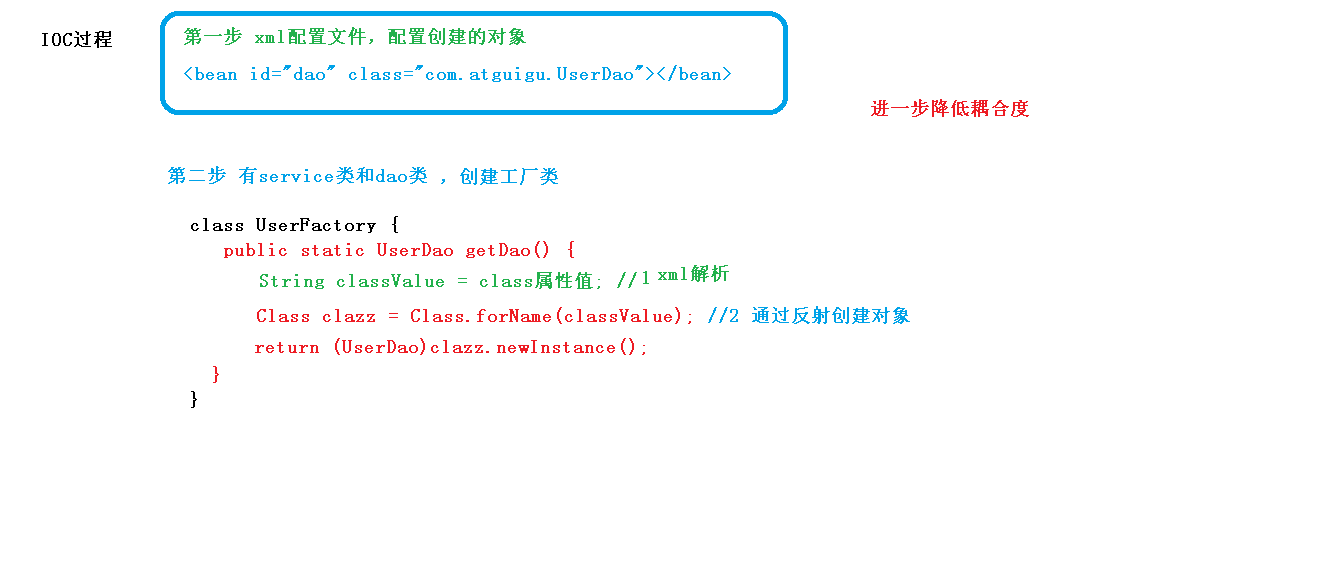
Spring IOC
IOC(概念和原理)
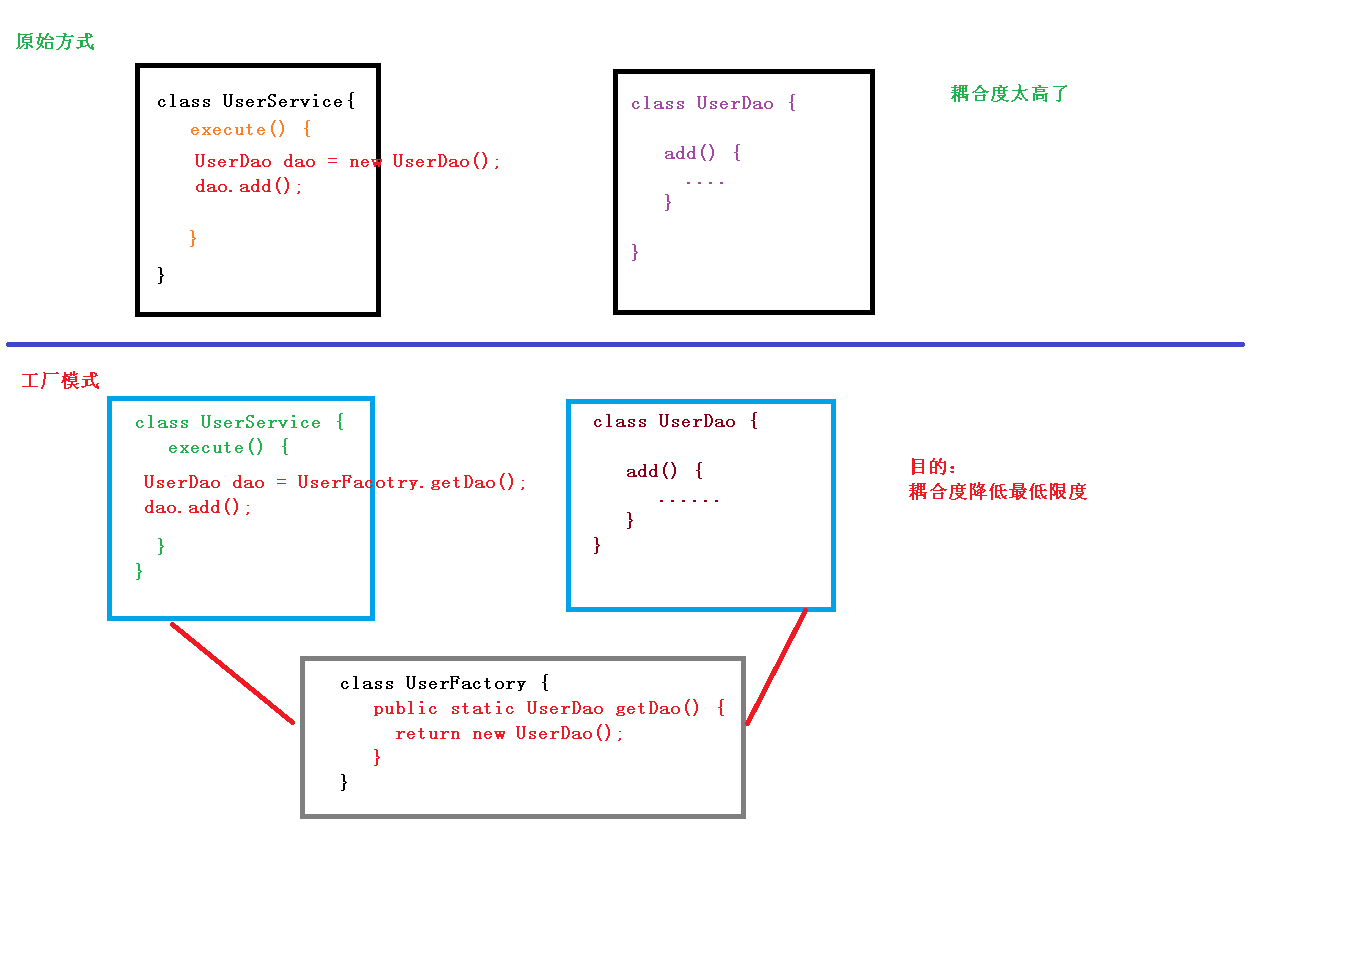
- 什么是IOC
- 控制反转,把对象创建和对象之间的调用过程,交给Spring进行管理
- 使用IOC的目的:为了耦合度降低
- 入门案例就是IOC实现
- IOC底层原理
- 图示讲解
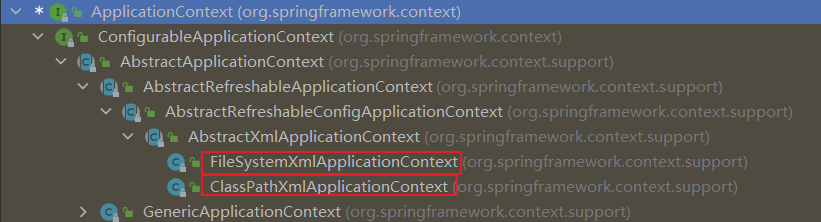
IOC(BeanFactory 接口)
* 加载配置文件时候不会创建对象,在获取对象(使用)才去创建对象
- ApplicationContext:BeanFactory 接口的子接口,提供更多更强大的功能,一般由开发人员进行使用
* 加载配置文件时候就会把在配置文件对象进行创建
ApplicationContext实现类的区别:
1
2
| new FileSystemXmlApplicationContext("c:/xxx.xml")
new ClassPathXmlApplicationContext("xxx.xml")
|
IOC操作Bean管理(概念)
IOC操作Bean管理(XML方式)
创建对象
- 在 spring 配置文件中,使用 bean 标签,标签里面添加对应属性,就可以实现对象创建
- 在 bean 标签有很多属性,介绍常用的属性
- id 属性:唯一标识
- class 属性:类全路径(包类路径)
- 创建对象时候,默认也是执行无参数构造方法完成对象创建
1
2
|
<bean id="user" class="com.along.User"/>
|
注入属性
IOC和DI的区别:DI是IOC的一种具体实现,标识依赖注入或是注入属性,但是注入属性需要在对象创建完成之后执行
使用set方法进行注入
(1) 创建类,定义属性和对应的set方法
1
2
3
4
5
6
7
8
9
10
11
12
13
14
15
16
17
18
19
20
21
22
23
24
| package com.along;
public class Book {
private String bname;
private String bauthor;
public void setBname(String bname) {
this.bname = bname;
}
public void setBauthor(String bauthor) {
this.bauthor = bauthor;
}
@Override
public String toString() {
return "Book{" +
"bname='" + bname + '\'' +
", bauthor='" + bauthor + '\'' +
'}';
}
}
|
(2) 在spring配置文件中配置对象创建,配置属性注入
1
2
3
4
5
| <bean id="bool" class="com.along.Book">
<property name="bname" value="葵花宝典"/>
<property name="bauthor" value="廖廖酱"/>
</bean>
|
(3) 测试
1
2
3
4
5
6
7
8
| @Test
public void testBook(){
ApplicationContext context = new ClassPathXmlApplicationContext("bean1.xml");
Book book = context.getBean("book", Book.class);
System.out.println(book);
}
|
使用有参构造器进行注入
(1)创建类,定义属性,创建属性对应有参数构造方法
1
2
3
4
5
6
7
8
9
10
11
12
13
14
15
16
17
18
19
20
21
| package com.along;
public class Orders {
private String oname;
private String address;
public Orders(String oname, String address) {
this.oname = oname;
this.address = address;
}
@Override
public String toString() {
return "Orders{" +
"oname='" + oname + '\'' +
", address='" + address + '\'' +
'}';
}
}
|
在Spring配置文件中进行配置
1
2
3
4
| <bean id="orders" class="com.along.Orders">
<constructor-arg name="oname" value="电脑" />
<constructor-arg name="address" value="China"/>
</bean>
|
(3) 测试
1
2
3
4
5
6
7
8
| @Test
public void testOrder(){
ApplicationContext context = new ClassPathXmlApplicationContext("bean1.xml");
Orders orders = context.getBean("orders", Orders.class);
System.out.println(orders);
}
|
p名称空间注入(了解)
使用 p 名称空间注入,可以简化基于 xml 配置方式
(1) 添加 p 名称空间在配置文件中 xmlns:p
1
2
3
4
5
| <?xml version="1.0" encoding="UTF-8"?>
<beans xmlns="http://www.springframework.org/schema/beans"
xmlns:xsi="http://www.w3.org/2001/XMLSchema-instance"
xmlns:p="http://www.springframework.org/schema/p" <!-- 这里(复制记得删除这里的注释) -->
xsi:schemaLocation="http://www.springframework.org/schema/beans http://www.springframework.org/schema/beans/spring-beans.xsd">
|
(2) 进行属性注入,在bean中进行操作
1
| <bean id="bookp" class="com.along.Book" p:bname="九阴真经" p:bauthor="廖廖"></bean>
|
(3) 测试
1
2
3
4
5
6
7
8
| @Test
public void testBookP(){
ApplicationContext context = new ClassPathXmlApplicationContext("bean1.xml");
Book book = context.getBean("bookp", Book.class);
System.out.println(book);
}
|
注入空值和其他类型属性
注入空值
1
2
3
| <property name="address">
<null/>
</property>
|
属性值包含特殊符号,比如 <廖狗>
(1) 把<>进行转义 <>
(2) 把带特殊符号内容写到 CDATA
1
2
3
| <property name="address">
<value><![CDATA[<<南京>>]]></value>
</property>
|
注入外部Bean
创建dao层以及实现类
1
2
3
4
5
6
7
| package com.along.dao;
public class UserDao {
public String getMessage(){
return "UserDao调用数据库....";
}
}
|
创建service层以及实现类
1
2
3
4
5
6
7
8
9
10
11
12
13
14
15
16
| package com.along.service;
import com.along.dao.UserDao;
public class UserService {
private UserDao userDao;
public void setUserDao(UserDao userDao) {
this.userDao = userDao;
}
public void getMsg(){
System.out.println("service getMsg()....");
System.out.println(userDao.getMessage());
}
}
|
xml文件注入
1
2
3
4
5
6
|
<bean id="userDaoImpl" class="com.along.dao.UserDao"></bean>
<bean id="userService" class="com.along.service.UserService">
<property name="userDao" ref="userDaoImpl"/>
</bean>
|
测试
1
2
3
4
5
6
| @Test
public void testUserService(){
ApplicationContext applicationContext = new ClassPathXmlApplicationContext("bean1.xml");
UserService userService = applicationContext.getBean("userService", UserService.class);
userService.getMsg();
}
|
结果:
service getMsg()….
UserDao调用数据库….
注入内部Bean
一对多关系:部门和员工
一个部门有多个员工,一个员工属于一个部门
部门是一,员工是多
在实体类之间表示一对多关系,员工表示所属部门,使用对象类型属性进行表示
创建实体类
部门类 员工.java
1
2
3
4
5
6
7
8
9
10
11
12
13
14
15
16
17
18
19
20
21
22
23
24
25
26
27
28
29
30
31
32
33
34
| package com.along;
public class Emp {
private String ename;
private String gender;
private Dept dept;
public Dept getDept() {
return dept;
}
public void setDept(Dept dept) {
this.dept = dept;
}
public void setEname(String ename) {
this.ename = ename;
}
public void setGender(String gender) {
this.gender = gender;
}
@Override
public String toString() {
return "Emp{" +
"ename='" + ename + '\'' +
", gender='" + gender + '\'' +
", dept=" + dept +
'}';
}
}
|
部门 Dept.java
1
2
3
4
5
6
7
8
9
10
11
12
13
14
15
16
| package com.along;
public class Dept {
private String dname;
public void setDname(String dname) {
this.dname = dname;
}
@Override
public String toString() {
return "Dept{" +
"dname='" + dname + '\'' +
'}';
}
}
|
xml文件注入
新建一个xml文件,叫bean-emp.xml
第一种方式注入
1
2
3
4
5
6
7
8
9
10
11
|
<bean id="empA" class="com.along.Emp">
<property name="ename" value="廖廖酱"/>
<property name="gender" value="男"/>
<property name="dept" ref="deptA"/>
</bean>
<bean id="deptA" class="com.along.Dept">
<property name="dname" value="扫黄部门"/>
</bean>
|
第二种方式注入
1
2
3
4
5
6
7
8
9
10
11
12
13
14
|
<bean id="empB" class="com.along.Emp">
<property name="ename" value="杰哥"/>
<property name="gender" value="男"/>
<property name="dept" ref="deptB"/>
<property name="dept.dname" value="打非部门"/>
</bean>
<bean id="deptB" class="com.along.Dept">
<property name="dname">
<null/>
</property>
</bean>
|
注入集合类型
创建类,定义数组、list、map、set 类型属性,生成对应 set 方法
1
2
3
4
5
6
7
8
9
10
11
12
13
14
15
16
17
18
19
20
21
22
23
24
25
26
27
28
29
30
31
32
33
34
35
36
37
38
39
40
41
42
43
44
45
| package com.along;
import java.util.Arrays;
import java.util.List;
import java.util.Map;
import java.util.Set;
public class Stu {
private String[] courses;
private List<String> list;
public void setCourses(String[] courses) {
this.courses = courses;
}
public void setList(List<String> list) {
this.list = list;
}
public void setMaps(Map<String, String> maps) {
this.maps = maps;
}
public void setSets(Set<String> sets) {
this.sets = sets;
}
private Map<String, String> maps;
private Set<String> sets;
@Override
public String toString() {
return "Stu{" +
"courses=" + Arrays.toString(courses) +
", list=" + list +
", maps=" + maps +
", sets=" + sets +
'}';
}
}
|
在spring配置文件进行配置
1
2
3
4
5
6
7
8
9
10
11
12
13
14
15
16
17
18
19
20
21
22
23
24
25
26
27
28
29
30
31
32
| <bean id="stu" class="com.along.Stu">
<property name="courses">
<array>
<value>廖廖酱</value>
<value>杰哥</value>
</array>
</property>
<property name="list">
<list>
<value>廖廖酱</value>
<value>杰哥</value>
</list>
</property>
<property name="maps">
<map>
<entry key="JAVA" value="java"/>
<entry key="PYTHON" value="python"/>
<entry key="NODE" value="node"/>
</map>
</property>
<property name="sets">
<set>
<value>MYSQL</value>
<value>MongoDB</value>
<value>Redis</value>
</set>
</property>
</bean>
|
测试
1
2
3
4
5
6
| @Test
public void testStu(){
ApplicationContext applicationContext = new ClassPathXmlApplicationContext("bean-stu.xml");
Stu stu = applicationContext.getBean("stu", Stu.class);
System.out.println(stu);
}
|
结果:
Stu{
courses=[廖廖酱, 杰哥],
list=[廖廖酱, 杰哥],
maps={JAVA=java, PYTHON=python, NODE=node},
sets=[MYSQL, MongoDB, Redis]
}
在集合里面设置对象类型值
创建多个Book对象
1
2
3
4
5
6
7
8
9
10
| <bean id="bookA" class="com.along.Book">
<property name="bname" value="葵花宝典A"/>
<property name="bauthor" value="廖廖酱A"/>
</bean>
<bean id="bookB" class="com.along.Book">
<property name="bname" value="葵花宝典B"/>
<property name="bauthor" value="廖廖酱B"/>
</bean>
|
注入list集合类型
1
2
3
4
5
6
| <property name="bookList">
<list>
<ref bean="bookA"></ref>
<ref bean="bookB"></ref>
</list>
</property>
|
使用util标签完成list集合注入提取
建议创建一个新的 Java项目,和刚开始的步骤一样
建议创建一个新的 Java项目,和刚开始的步骤一样
spring 配置文件中引入名称空间 util
xmlns:util
1
2
3
4
5
6
7
8
| <?xml version="1.0" encoding="UTF-8"?>
<beans xmlns="http://www.springframework.org/schema/beans"
xmlns:xsi="http://www.w3.org/2001/XMLSchema-instance"
xmlns:util="http://www.springframework.org/schema/util"
xsi:schemaLocation="http://www.springframework.org/schema/beans http://www.springframework.org/schema/beans/spring-beans.xsd
http://www.springframework.org/schema/util http://www.springframework.org/schema/beans/spring-util.xsd">
</beans>
|
添加Book类
1
2
3
4
5
6
7
8
9
10
11
12
13
14
15
16
17
18
| package com.along.connection;
import java.util.List;
public class Book {
List<String> bookNameList;
public void setBookNameList(List<String> bookNameList) {
this.bookNameList = bookNameList;
}
@Override
public String toString() {
return "Book{" +
"bookNameList=" + bookNameList +
'}';
}
}
|
编写xml文件
1
2
3
4
5
6
7
8
9
10
|
<util:list id="bookList">
<value>易筋经</value>
<value>九阴真经</value>
<value>九阳神功</value>
</util:list>
<bean id="book" class="com.along.connection.Book">
<property name="bookNameList" ref="bookList"/>
</bean>
|
测试
1
2
3
4
5
6
| @Test
public void testBook() {
ApplicationContext applicationContext = new ClassPathXmlApplicationContext("bean-book.xml");
Book book = applicationContext.getBean("book", Book.class);
System.out.println(book);
}
|
结果:
Book{
bookNameList=[易筋经, 九阴真经, 九阳神功]
}
IOC 操作Bean管理(FactoryBean)
- Spring 有两种类型 bean,一种普通 bean,另外一种工厂 bean(FactoryBean)
- 普通 bean:在配置文件中定义 bean 类型就是返回类型
- 工厂 bean:在配置文件定义 bean 类型可以和返回类型不一样
实现方式:
(1) 创建类,让这个类作为工厂 bean,实现接口 FactoryBean
(2) 实现接口里面的方法,在实现的方法中定义返回的 bean 类型
创建类
User类
1
2
3
4
5
6
7
8
9
10
11
12
13
14
15
16
| package com.along.bean;
public class User {
private String name;
public void setName(String name) {
this.name = name;
}
@Override
public String toString() {
return "User{" +
"name='" + name + '\'' +
'}';
}
}
|
MyBean类
1
2
3
4
5
6
7
8
9
10
11
12
13
14
15
16
17
18
19
20
21
22
23
24
25
| package com.along.factory;
import com.along.bean.User;
import org.springframework.beans.factory.FactoryBean;
public class MyBean implements FactoryBean<User> {
@Override
public User getObject() throws Exception {
User user = new User();
user.setName("廖狗");
return user;
}
@Override
public Class<?> getObjectType() {
return null;
}
@Override
public boolean isSingleton() {
return FactoryBean.super.isSingleton();
}
}
|
测试代码
1
2
3
4
5
6
| @Test
public void testMyBean() {
ApplicationContext applicationContext = new ClassPathXmlApplicationContext("bean-factory.xml");
User user = applicationContext.getBean("myBean", User.class);
System.out.println(user);
}
|
Bean的作用域
Spring中,设置创建bean实例是单实例还是多实例
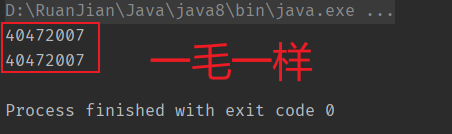
默认情况下,bean 是单实例对象
1
2
3
4
5
6
7
8
| @Test
public void testBook() {
ApplicationContext applicationContext = new ClassPathXmlApplicationContext("bean-book.xml");
Book bookA = applicationContext.getBean("book", Book.class);
Book bookB = applicationContext.getBean("book", Book.class);
System.out.println(bookA.hashCode());
System.out.println(bookB.hashCode());
}
|
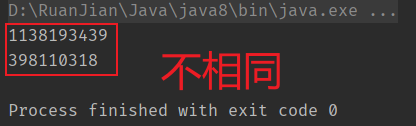
设置单实例还是多实例
- 在 spring 配置文件 bean 标签里面有属性(scope)用于设置单实例还是多实例
- scope 属性值
- 默认值,singleton,表示是单实例对象
- prototype,表示是多实例对象
在bean xml文件中设置
1
2
3
4
5
|
<bean id="book" class="com.along.connection.Book" scope="prototype">
<property name="bookNameList" ref="bookList"/>
</bean>
|
再次测试:
Bean的生命周期
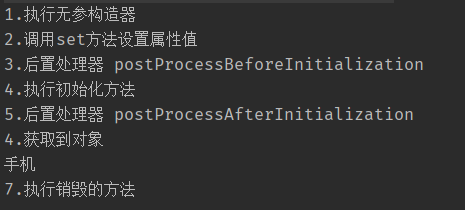
完整生命周期(7步)
- 通过构造器创建 bean 实例(无参数构造)
- 为 bean 的属性设置值和对其他 bean 引用(调用 set 方法)
- 把 bean 实例传递 bean 后置处理器的方法 postProcessBeforeInitialization
- 调用 bean 的初始化的方法(需要进行配置初始化的方法)
- 把 bean 实例传递 bean 后置处理器的方法 postProcessAfterInitialization
- bean 可以使用了(对象获取到了)
- 当容器关闭时候,调用 bean 的销毁的方法(需要进行配置销毁的方法)
演示生命周期
创建Orders类
1
2
3
4
5
6
7
8
9
10
11
12
13
14
15
16
17
18
19
20
21
22
23
24
25
26
27
| public class Orders {
private String oname;
public Orders() {
System.out.println("1.执行无参构造器");
}
public String getOname() {
return oname;
}
public void setOname(String oname) {
this.oname = oname;
System.out.println("2.调用set方法设置属性值");
}
public void initMethod() {
System.out.println("4.执行初始化方法");
}
public void destoryMethod(){
System.out.println("7.执行销毁的方法");
}
}
|
添加后置处理器
创建MyBeanPost类,实现BeanPostProcessor接口,创建后置处理器
1
2
3
4
5
6
7
8
9
10
11
12
13
| public class MyBeanPost implements BeanPostProcessor {
@Override
public Object postProcessBeforeInitialization(Object bean, String beanName) throws BeansException {
System.out.println("3.后置处理器 postProcessBeforeInitialization");
return bean;
}
@Override
public Object postProcessAfterInitialization(Object bean, String beanName) throws BeansException {
System.out.println("5.后置处理器 postProcessAfterInitialization");
return bean;
}
}
|
测试代码
1
2
3
4
5
6
7
8
9
10
11
12
| @Test
public void testOrders() {
ApplicationContext applicationContext = new ClassPathXmlApplicationContext("bean-orders.xml");
Orders orders = applicationContext.getBean("orders", Orders.class);
System.out.println("4.获取到对象");
System.out.println(orders.getOname());
((ClassPathXmlApplicationContext) applicationContext).close();
}
|
XML自动装配
什么是自动装配
- 根据指定装配规则(属性名称或者属性类型),Spring 自动将匹配的属性值进行注入
实现自动装配
- 在Bean标签中有一个autowire的属性,属性中有两个值
- byName 根据属性名称注入 ,注入值 bean 的 id 值和类属性名称一样
- byType 根据属性类型注入
XML注入方式普遍用的不多,推荐使用注解方式
演示
本次还是使用Emp员工 与 Dept部门进行演示
创建Dept部门类
1
2
3
4
5
6
7
8
9
10
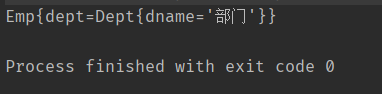
| public class Dept {
private final String dname = "部门";
@Override
public String toString() {
return "Dept{" +
"dname='" + dname + '\'' +
'}';
}
}
|
创建Emp员工类
1
2
3
4
5
6
7
8
9
10
11
12
13
14
15
16
17
18
19
20
21
22
| public class Emp {
private Dept dept;
public Dept getDept() {
return dept;
}
public void setDept(Dept dept) {
this.dept = dept;
}
public void test(){
System.out.println(dept);
}
@Override
public String toString() {
return "Emp{" +
"dept=" + dept +
'}';
}
}
|
配置xml文件
1
2
3
4
5
6
7
8
9
10
11
|
<bean id="emp" class="com.along.autowire.Emp" autowire="byType">
</bean>
<bean id="dept" class="com.along.autowire.Dept"/>
|
创建测试类
1
2
3
4
5
6
| @Test
public void testEmp() {
ApplicationContext applicationContext = new ClassPathXmlApplicationContext("bean-autowire.xml");
Emp emp = applicationContext.getBean("emp", Emp.class);
System.out.println(emp);
}
|
结果
外部属性文件注入
本次拿数据库连接池Druid(德鲁伊)举例子
导入druid,c3p0,mysql驱动(这些配套资料中有)
直接注入
1
2
3
4
5
6
| <bean id="dataSource" class="com.alibaba.druid.pool.DruidDataSource">
<property name="driverClassName" value="com.mysql.cj.jdbc.Driver"/>
<property name="url" value="jdbc:mysql://localhost:3306/mybatis_plus"/>
<property name="name" value="root" />
<property name="password" value="123456" />
</bean>
|
外部注入
创建 jdbc.properties 文件
1
2
3
4
| jdbc.driverClassName=com.mysql.cj.jdbc.Driver
jdbc.url=jdbc:mysql://localhost:3306/mybatis_plus
jdbc.userName=root
jdbc.password=123456
|
引入命名空间 context
1
2
3
4
5
6
7
8
| <?xml version="1.0" encoding="UTF-8"?>
<beans xmlns="http://www.springframework.org/schema/beans"
xmlns:xsi="http://www.w3.org/2001/XMLSchema-instance"
xmlns:context="http://www.springframework.org/schema/context"
xsi:schemaLocation="http://www.springframework.org/schema/beans http://www.springframework.org/schema/beans/spring-beans.xsd
http://www.springframework.org/schema/context http://www.springframework.org/schema/context/spring-context.xsd"
>
</beans>
|
引入外部文件
1
| <context:property-placeholder location="jdbc.properties" />
|
配置连接池
使用 ${} 表达式取到 jdbc.properties中的 key
1
2
3
4
5
6
| <bean id="dataSource" class="com.alibaba.druid.pool.DruidDataSource">
<property name="driverClassName" value="${jdbc.driverClassName}"/>
<property name="url" value="${jdbc.url}"/>
<property name="name" value="${jdbc.userName}"/>
<property name="password" value="${jdbc.password}"/>
</bean>
|
IOC操作Bean管理(注解方式)
这里推荐创建一个新的项目来学习
什么是注解
- 注解是代码特殊标记,格式:@注解名称(属性名称=属性值, 属性名称=属性值..)
- 使用注解,注解作用在类上面,方法上面,属性上面
- 使用注解目的:简化 xml 配置
针对 Bean 管理中创建对象提供注解
- @Component
- @Service
- @Controller
- @Respository 一般用在持久层中
上面四个注解的功能是一样的,都可以创建bean实例
基于注解方式创建对象
1.引入 SpringAop 依赖 (这里就不演示了,配套资料都有)
2.开启组件扫描
首先添加命名空间 context (不演示了,上面有)
1
2
3
4
5
6
|
<context:component-scan base-package="com.along"></context:component-scan>
|
创建类,在类上方添加创建对象注解
注解中的value属性可以不写
默认值是类名称,首字母小写
UserService ==> userService
ProductDao ==> productDao
1
2
3
4
5
6
7
8
9
|
@Component(value = "userService")
public class UserService {
public void add(){
System.out.println("service add ...");
}
}
|
测试代码
结果:
com.along.service.UserService@6293abcc
service add …
1
2
3
4
5
6
7
| @Test
public void testService() {
ApplicationContext applicationContext = new ClassPathXmlApplicationContext("bean.xml");
UserService userService = applicationContext.getBean("userService", UserService.class);
System.out.println(userService);
userService.add();
}
|
组件扫描细节配置
1
2
3
4
5
6
7
8
9
10
11
12
13
14
15
16
17
18
|
<context:component-scan base-package="com.along" use-default-filters="false">
<context:include-filter type="annotation" expression="org.springframework.stereotype.Controller"/>
</context:component-scan>
<context:component-scan base-package="com.along" use-default-filters="false">
<context:exclude-filter type="annotation" expression="org.springframework.stereotype.Controller"/>
</context:component-scan>
|
注解方式实现属性注入(稍微抽象)
@Autowired:根据属性类型进行自动装配
- 把service和dao对象创建,在service和dao类添加创建对象注解
- 在service注入dao对象,在 service 类添加dao类型属性,在属性上面使用注解
@Qualifier:根据属性名称进行注入
@Qualifier 注解的使用,和上面@Autowired 一起使用
// 不用添加set方法
@Autowired //根据类型进行注入
@Qualifier(value = "userDaoImpl1") //根据名称进行注入
private UserDao userDao;
1
2
3
4
5
6
7
8
| ```
3. @Resource:可根据类型注入,可根据名称注入
- ```java
//@Resource //根据类型进行注入
@Resource(name = "userDaoImpl1") //根据名称进行注入
private UserDao userDao;
|
1
2
3
4
5
6
|
4. @Value:注入普通类型属性

   - ```java
@Value(value = "abc")
private String name;
|
完全注解开发
创建配置类
1
2
3
4
| @Configuration
@ComponentScan(basePackages = {"com.along"})
public class SpringConfig {
}
|
编写测试类
1
2
3
4
5
6
7
8
9
| @Test
public void testService2() {
ApplicationContext context = new AnnotationConfigApplicationContext(SpringConfig.class);
UserService userService = context.getBean("userService",UserService.class);
System.out.println(userService);
userService.add();
}
|
Spring AOP
这里往后有些抽象
AOP概述
- 面向切面编程(AOP)通过提供另一种考虑程序结构的方法对面向对象编程(OOP)进行了补充。
- OOP中模块化的关键单元是类,而AOP中模块化的关键单元是aspect(切面)。
- Spring的关键组件之一是AOP框架。 虽然Spring IoC容器不依赖于AOP(这意味着如果您不想使用AOP就不需要),但AOP对Spring IoC进行了补充,提供了一个非常强大的企业级解决方案。
这里有几个名词需要了解一下:
- aop alliance:是AOP联盟,该组织定义了很多针对面向切面的接口api,通常Spring等其它具备动态织入功能的框架依赖此包。
- AspectJ:AOP虽然是方法论,但就好像OOP中的Java一样,一些先行者也开发了一套语言来支持AOP。目前用得比较火的就是AspectJ语言了,它是一种几乎和Java完全一样的语言,而且完全兼容Java。当然spring也有独立的AOP的实现。
AOP概念和术语
- Aspect(切面):一个关注点的模块化,这个关注点可能会横切多个对象。事务管理是J2EE应用中一个关于横切关注点的很好的例子。
- Pointcut(切入点 ):匹配连接点(Joinpoint)的断言。通知和一个【切入点表】达式关联,并在满足这个切入点的连接点上运行。 【切入点表达式如何和连接点匹配】是AOP的核心:Spring缺省使用AspectJ切入点语法。
- Introduction(引入): Spring允许引入新的接口(以及一个对应的实现)到任何被代理的对象。例如,你可以使用一个引入来使bean实现 IsModified 接口,以便简化缓存机制。
- Target object(目标对象):被一个或者多个切面(aspect)所通知(advise)的对象。也有人把它叫做 被通知(advised)对象。 既然Spring AOP是通过运行时代理实现的,这个对象永远是一个 被代理(proxied) 对象。
- AOP代理 AOP proxy: 在Spring中,AOP代理可以是JDK动态代理或者CGLIB代理。
- Weaving(织入):把切面(aspect)连接到其它的应用程序类型或者对象上,并创建一个被通知(advised)的对象,这个过程叫织入。 这些可以在编译时(例如使用AspectJ编译器),类加载时和运行时完成。 Spring和其他纯Java AOP框架一样,在运行时完成织入。
Spring AOP包括以下类型的通知:
- Before advice :在连接点之前运行的通知,但不能阻止执行流继续执行到连接点(除非它抛出异常)。
- After returning advice :在连接点正常完成后运行的通知(例如,如果方法返回而不引发异常)。
- After throwing advice:在方法通过抛出异常退出时运行的通知。
- After (finally) advice:不管连接点以何种方式退出(正常或异常返回),都要运行的通知。
- Around advice:围绕连接点(如方法调用)的通知。 这是最有力的建议。 Around通知可以在方法调用前后执行自定义行为。 它还负责选择是继续到连接点,还是通过返回自己的返回值或抛出异常来简化被通知的方法执行。
Spring AOP能力和目标
- Spring AOP是用纯Java实现的。 不需要特殊的编译过程。
- Spring AOP目前只支持【方法执行连接点】(在Spring bean上的方法上执行通知)。 如果需要通知字段访问和更新连接点,可以考虑使用AspectJ之类的语言
- Spring AOP的AOP方法不同于大多数其他AOP框架。 目的不是提供最完整的AOP实现(尽管Spring AOP很有能力)。 相反,其目的是提供AOP实现和Spring IOC之间的紧密集成,以帮助解决企业应用程序中的常见问题。
Spring和AspectJ
Spring框架的AOP功能通常与Spring IoC容器一起使用。 切面是通过使用普通beanDifination语法配置的。 使用Spring AOP不能轻松或有效地完成一些事情,比如通知非常细粒度的对象(通常是域对象)。 AspectJ是这种情况下的最佳选择。 然而,我们的经验是,Spring AOP为企业Java应用程序中的大多数问题提供了一个很好的解决方案。
Spring AOP从不与AspectJ竞争,以提供全面的AOP解决方案。 我们相信基于代理的框架(如Spring AOP)和成熟的框架(如AspectJ)都是有价值的,它们是互补的,而不是相互竞争的。Spring无缝地将Spring AOP和IoC与AspectJ集成在一起,以支持在一致的基于Spring的应用程序体系结构中使用AOP。 这种集成不会影响Spring AOP API或AOP Alliance API, Spring AOP保持向后兼容。
AOP代理
Spring AOP默认为AOP代理使用标准的JDK动态代理, 这允许代理任何接口(或接口集)。
Spring AOP也可以使用CGLIB代理。 缺省情况下,如果业务对象没有实现接口,则使用CGLIB。 由于编写接口是很好的实践,因此业务类通常实现一个或多个业务接口是可能的。
代码演示AOP代理:
这里最好懂得Java的反射机制,否则可能有点不好理解
引入依赖包
1
2
3
4
5
6
7
8
9
10
11
12
13
14
15
16
17
18
19
20
21
22
23
24
25
26
27
28
29
30
31
32
33
34
35
36
37
38
39
40
41
42
43
44
45
46
47
48
49
50
51
|
<dependency>
<groupId>junit</groupId>
<artifactId>junit</artifactId>
<version>4.13.2</version>
<scope>test</scope>
</dependency>
<dependency>
<groupId>org.hamcrest</groupId>
<artifactId>hamcrest</artifactId>
<version>2.2</version>
<scope>test</scope>
</dependency>
<dependency>
<groupId>org.springframework</groupId>
<artifactId>spring-core</artifactId>
<version>5.2.18.RELEASE</version>
</dependency>
<dependency>
<groupId>org.springframework</groupId>
<artifactId>spring-beans</artifactId>
<version>5.2.18.RELEASE</version>
</dependency>
<dependency>
<groupId>org.springframework</groupId>
<artifactId>spring-context</artifactId>
<version>5.2.18.RELEASE</version>
</dependency>
<dependency>
<groupId>org.aspectj</groupId>
<artifactId>aspectjweaver</artifactId>
<version>1.9.6</version>
</dependency>
<dependency>
<groupId>commons-logging</groupId>
<artifactId>commons-logging</artifactId>
<version>1.2</version>
</dependency>
<dependency>
<groupId>log4j</groupId>
<artifactId>log4j</artifactId>
<version>1.2.12</version>
</dependency>
|
编写Service层代码
1
2
3
| public interface IUserService {
void save();
}
|
1
2
3
4
5
6
| public class UserService implements IUserService {
@Override
public void save() {
System.out.println("保存成功....");
}
}
|
编写Config类
AppConfig.java
1
2
3
4
| @Configuration
@ComponentScan("com.along")
public class AppConfig {
}
|
编写Bean的后置处理器
ProxyBeanPostProcessor
1
2
3
4
5
6
7
8
9
10
11
12
13
14
15
16
17
18
19
20
21
22
23
24
| @Component
public class ProxyBeanPostProcessor implements BeanPostProcessor {
@Override
public Object postProcessAfterInitialization(Object bean, String beanName) throws BeansException {
Object proxyBean = Proxy.newProxyInstance(Thread.currentThread().getContextClassLoader(), bean.getClass().getInterfaces(), new InvocationHandler() {
@Override
public Object invoke(Object proxy, Method method, Object[] args) throws Throwable {
System.out.println("开启事务");
try {
Object invoke = method.invoke(bean, args);
System.out.println("提交事务");
return invoke;
} catch (RuntimeException ex) {
System.out.println("回滚");
throw new RuntimeException("出异常了");
}
}
});
return proxyBean;
}
|
添加主方法
App.java
1
2
3
4
5
6
7
| public class App {
public static void main(String[] args) {
ApplicationContext app = new AnnotationConfigApplicationContext(AppConfig.class);
IUserService bean = app.getBean(IUserService.class);
bean.save();
}
}
|
结果:
开启事务
保存成功….
提交事务
@AspectJ风格的支持
@AspectJ是将【切面】声明为带有注解的常规Java类的一种风格。 @AspectJ风格是由AspectJ项目open innew window作为AspectJ 5发行版的一部分引入的。 Spring与AspectJ5有相同的注解, 但是,AOP运行时仍然是纯Spring AOP,并且不依赖于AspectJ编译器或编织器。
要在Spring配置中使用@AspectJ注解,您需要启用Spring支持
开启AspectJ支持
注解方式开启
1
2
3
4
5
| @Configuration
@ComponentScan("com.along")
@EnableAspectJAutoProxy
public class AppConfig {
}
|
XML方式开启(记得打开apo命名空间)
声明一个切面
1
2
3
4
5
|
@Aspect
@Component
public class MyAspect {
}
|
通过组件扫描自动检测切面你可以在Spring XML配置中通过“@Configuration”类中的“@Bean”方法将切面类注册为常规bean,或者让Spring通过类路径扫描自动检测它——就像任何其他Spring管理的bean一样。 但是,请注意,“@Aspect”注解不足以实现类路中的自动检测。 为了达到这个目的,您需要添加一个单独的【@Component】注解。
声明一个切入点
怎么确定一个方法:public void com.ydlclass.service.impl.*(..)
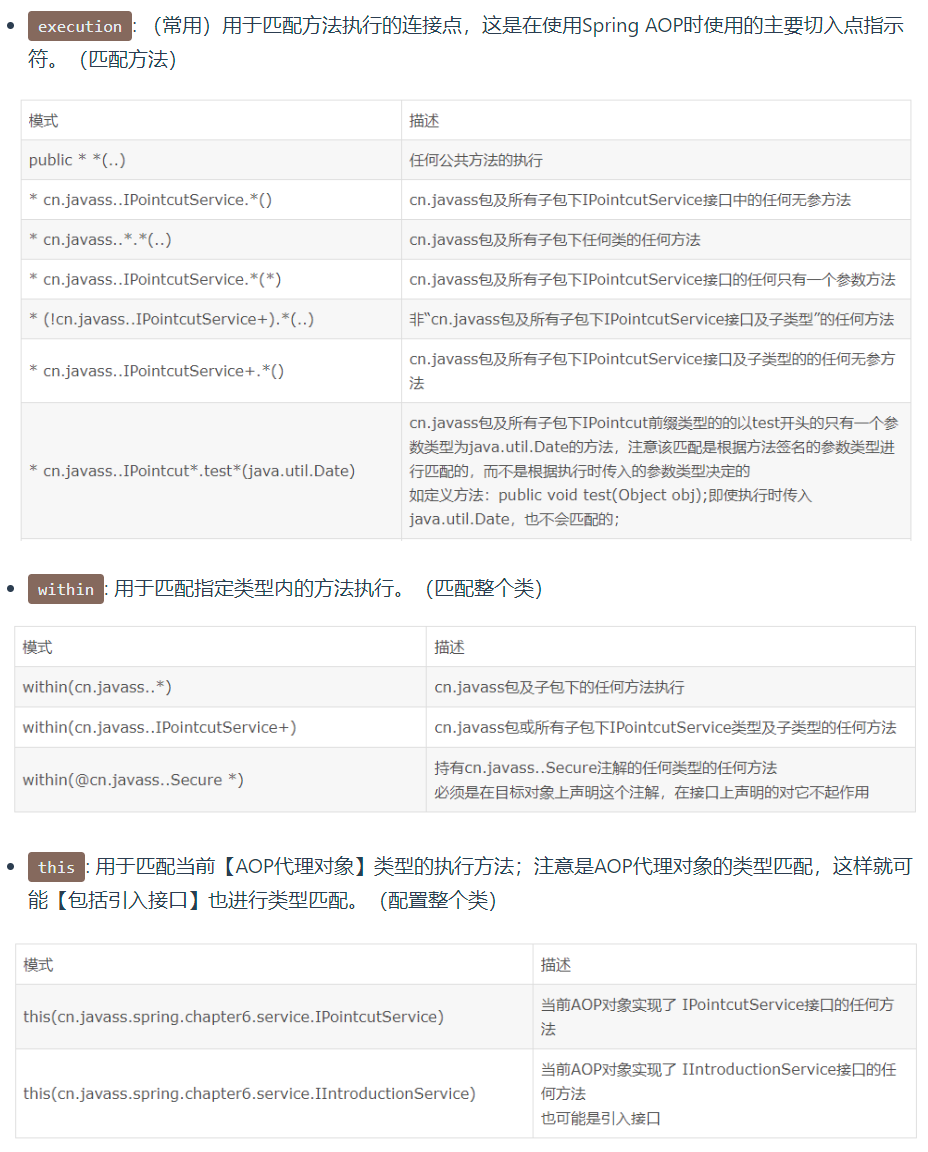
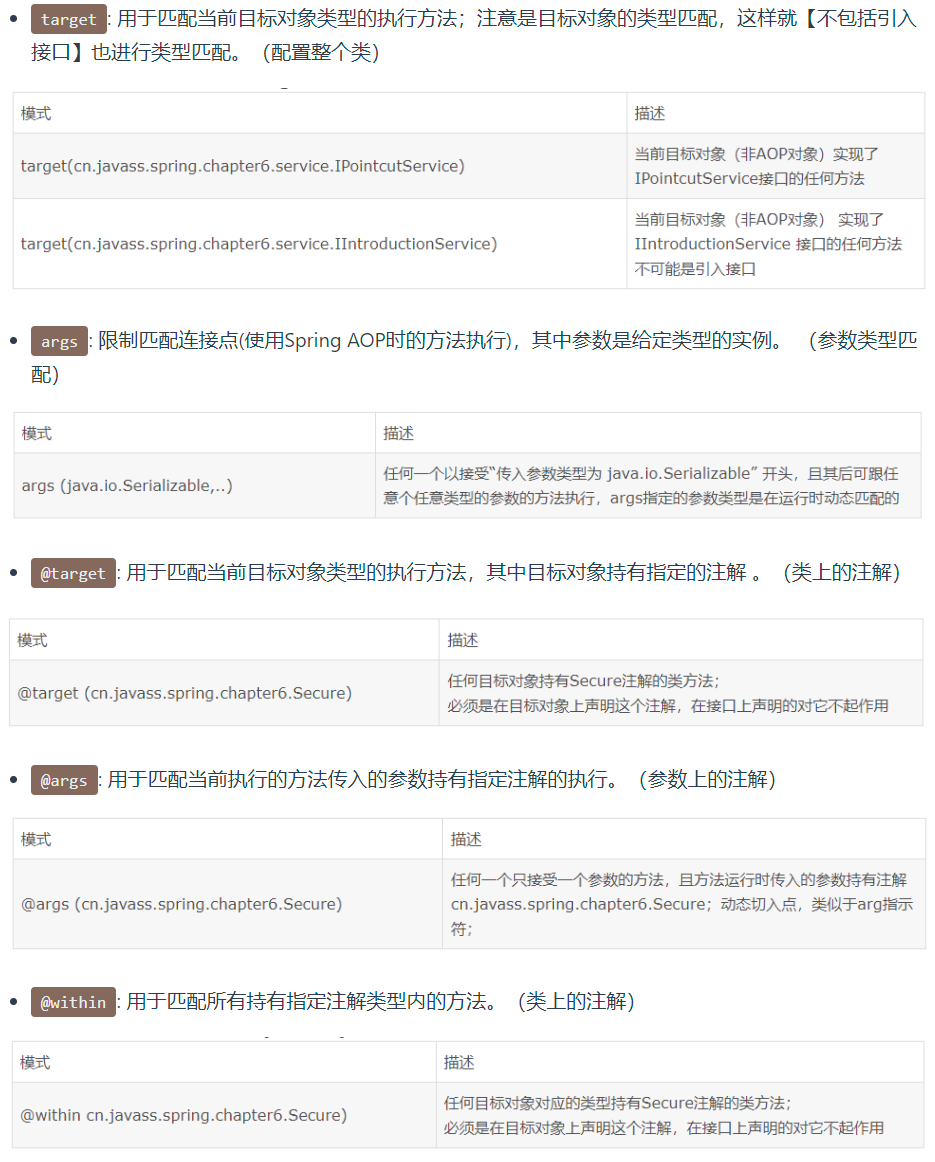
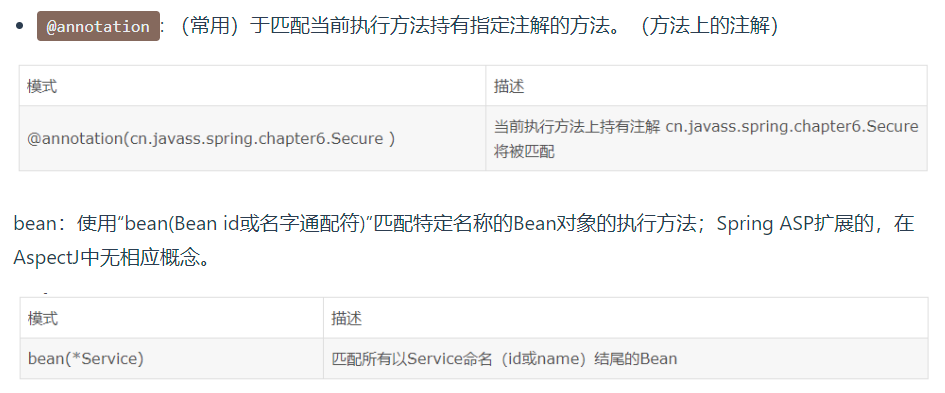
支持切入点指示器
Spring AOP支持以下在切入点表达式中使用的AspectJ切入点指示器(PCD):
切入点表达式运算
可以使用’ &&’ || ‘和’ ! ‘组合切入点表达式。 您还可以通过名称引用切入点表达式。 下面的例子展示了三个切入点表达式:
1
2
3
4
5
6
7
8
| @Pointcut("execution(public * *(..))")
private void anyPublicOperation() {}
@Pointcut("within(com.xyz.myapp.trading..*)")
private void inTrading() {}
@Pointcut("anyPublicOperation() && inTrading()")
private void tradingOperation() {}
|
共享公共切入点定义
1
2
3
4
5
6
7
8
9
10
11
12
13
14
15
16
17
| @Aspect
public class CommonPointcuts {
@Pointcut("within(com.xyz.myapp.web..*)")
public void inWebLayer() {}
@Pointcut("within(com.xyz.myapp.service..*)")
public void inServiceLayer() {}
@Pointcut("within(com.xyz.myapp.dao..*)")
public void inDataAccessLayer() {}
@Pointcut("execution(* com.xyz.myapp..service.*.*(..))")
public void businessService() {}
@Pointcut("execution(* com.xyz.myapp.dao.*.*(..))")
public void dataAccessOperation() {}
}
|
准备Service
UserService
1
2
3
4
5
6
7
| @Service
public class UserService implements IUserService {
@Override
public void register() {
System.out.println("这是注册的方法");
}
}
|
OrderService
1
2
3
4
5
6
7
8
9
| @Service
public class OrderService implements IOrderService {
@Override
public void order(Integer money) {
System.out.println("这是order的方法");
}
}
|
ActivityService
1
2
3
4
5
6
| public class ActivityService implements IActivityService {
@Override
public void sendGift() {
System.out.println("送了礼物");
}
}
|
声明通知
Before advice)前置通知
@Before
1
2
3
4
5
6
7
8
9
10
11
12
13
14
|
@Before("beforePointcut()")
private void beforeAdvice(JoinPoint jp) throws InvocationTargetException,
IllegalAccessException {
MethodSignature signature = (MethodSignature) jp.getSignature();
Method method = signature.getMethod();
method.invoke(jp.getTarget(), jp.getArgs());
System.out.println("this is before advice");
}
|
(After returning advice)返回通知
1
2
3
4
5
6
7
|
@AfterReturning("execution(public * com.along..order(..))")
private void afterReturningAdvice() {
System.out.println("This is afterReturningAdvice");
}
|
(After throwing advice)抛出异常后通知
1
2
3
4
5
6
7
8
|
@AfterThrowing(value = "execution(public * com.along..order(..))", throwing = "ex")
private void afterThrowAdvice(ArithmeticException ex) {
System.out.println("This is afterThrowAdvice");
System.out.println("----------" + ex);
}
|
After (Finally) 最终通知
1
2
3
4
5
6
7
|
@After("execution(public * com.along..order(..))")
private void afterAdvice() {
System.out.println("This is afterAdvice");
}
|
Around通知
1
2
3
4
5
6
7
8
9
10
11
12
13
14
15
16
|
@Around("execution(public * com.along..order(..))")
private Object AroundAdvice(ProceedingJoinPoint pjp) throws Throwable {
System.out.println("This is AroundAdvice1");
Object proceed = pjp.proceed();
System.out.println("This is AroundAdvice2");
return proceed;
}
|
MyAspect.java 全部代码
1
2
3
4
5
6
7
8
9
10
11
12
13
14
15
16
17
18
19
20
21
22
23
24
25
26
27
28
29
30
31
32
33
34
35
36
37
38
39
40
41
42
43
44
45
46
47
48
49
50
51
52
53
54
55
56
57
58
59
60
61
62
63
64
65
66
67
68
69
70
71
72
73
74
75
76
77
78
79
80
81
82
83
84
85
86
87
88
89
90
91
92
93
| package com.along.aspectj;
import com.along.service.IActivityService;
import com.along.service.impl.ActivityService;
import org.aspectj.lang.JoinPoint;
import org.aspectj.lang.ProceedingJoinPoint;
import org.aspectj.lang.Signature;
import org.aspectj.lang.annotation.*;
import org.aspectj.lang.reflect.MethodSignature;
import org.springframework.stereotype.Component;
import java.lang.reflect.InvocationTargetException;
import java.lang.reflect.Method;
@Aspect
@Component
public class MyAspect {
@DeclareParents(value = "com.along.service.impl.OrderService", defaultImpl = ActivityService.class)
public static IActivityService activityService;
@Pointcut("execution(public * com.along ..*(..))")
private void beforePointcut() {
}
@Before("beforePointcut()")
private void beforeAdvice(JoinPoint jp) throws InvocationTargetException,
IllegalAccessException {
MethodSignature signature = (MethodSignature) jp.getSignature();
Method method = signature.getMethod();
method.invoke(jp.getTarget(), jp.getArgs());
System.out.println("this is before advice");
}
@AfterReturning("execution(public * com.along..order(..))")
private void afterReturningAdvice() {
System.out.println("This is afterReturningAdvice");
}
@After("execution(public * com.along..order(..))")
private void afterAdvice() {
System.out.println("This is afterAdvice");
}
@AfterThrowing(value = "execution(public * com.along..order(..))", throwing = "ex")
private void afterThrowAdvice(ArithmeticException ex) {
System.out.println("This is afterThrowAdvice");
System.out.println("----------" + ex);
}
@Around("execution(public * com.along..order(..))")
private Object AroundAdvice(ProceedingJoinPoint pjp) throws Throwable {
System.out.println("This is AroundAdvice1");
Object proceed = pjp.proceed();
System.out.println("This is AroundAdvice2");
return proceed;
}
@Before("execution(* com.along.service.impl.OrderService.*(..)) && args(money,..)")
public void validateAccount(Integer money) {
System.out.println("before-----" + money);
}
}
|
通知的参数(XML演示)
Spring提供了完整类型的通知,这意味着您可以在【通知签名】中声明【所需的参数】(就像我们前面在返回和抛出示例中看到的那样)。
访问当前 JoinPoint
getArgs(): 返回方法参数。getThis(): 返回代理对象。getTarget(): 返回目标对象。getSignature(): 返回被通知的方法的签名。toString(): 打印被建议的方法的有用描述。
1
2
3
4
5
6
7
8
9
10
11
12
13
| <bean id="myAop" class="com.along.aspectj.MyAop"/>
<bean id="orderService" class="com.along.service.impl.OrderService"/>
<bean id="userService" class="com.along.service.impl.UserService"/>
<aop:config>
<aop:aspect id="myaspect" ref="myAop">
<aop:pointcut id="pointcut" expression="execution(* com.along..*(..))"/>
<aop:before method="beforeAdvice" pointcut="execution(* com.along..*(..))"/>
<aop:after-returning method="afterReturningAdvice" pointcut-ref="pointcut"/>
<aop:after-throwing method="afterThrowAdvice" throwing="ex" pointcut-ref="pointcut"/>
<aop:after method="afterAdvice" pointcut-ref="pointcut"/>
<aop:around method="AroundAdvice" pointcut="execution(* com.along..*(..)) and args(money,..)"/>
</aop:aspect>
</aop:config>
|
切入点表达式的’ args(money,..) ‘部分有两个目的
1
2
3
4
5
6
7
8
9
10
11
12
13
14
15
16
17
18
19
20
21
22
23
24
25
26
27
28
29
30
31
32
33
34
| public class MyAop {
private void beforeAdvice(JoinPoint jp) throws InvocationTargetException,
IllegalAccessException {
MethodSignature signature = (MethodSignature) jp.getSignature();
Method method = signature.getMethod();
method.invoke(jp.getTarget(), jp.getArgs());
System.out.println("this is before advice");
}
private void afterReturningAdvice() {
System.out.println("This is afterReturningAdvice");
}
private void afterAdvice() {
System.out.println("This is afterAdvice");
}
private void afterThrowAdvice(ArithmeticException ex) {
System.out.println("This is afterThrowAdvice");
System.out.println("----------" + ex);
}
private Object AroundAdvice(ProceedingJoinPoint pjp, Integer money) throws Throwable {
System.out.println("This is AroundAdvice1");
System.out.println("-----------" + money);
Object proceed = pjp.proceed();
System.out.println("This is AroundAdvice2");
return proceed;
}
}
|
Main方法
1
2
3
4
5
6
7
| public class AppByXml {
public static void main(String[] args) {
ApplicationContext app = new ClassPathXmlApplicationContext("aop.xml");
IOrderService bean = app.getBean(IOrderService.class);
bean.order(100);
}
}
|
将参数传递给Advice
- 首先,它限制只匹配哪些方法执行,其中方法接受至少一个参数,并且传递给该参数的参数是’ Account ‘的一个实例。
- 其次,它通过’ Account ‘参数使通知可以使用实际的’ Account ‘对象。
引入Introduction
引入使切面能够声明被通知的对象【实现给定的接口】,也就是让代理对象实现新的接口。
1
2
3
4
5
6
|
@DeclareParents(value = "com.along.service.impl.OrderService", defaultImpl = ActivityService.class)
public static IActivityService activityService;
|
运行
1
2
3
4
5
6
7
8
9
10
| public class App {
public static void main(String[] args) {
ApplicationContext app = new AnnotationConfigApplicationContext(AppConfig.class);
IOrderService bean = app.getBean(IOrderService.class);
bean.order(10000);
IActivityService bean1 = app.getBean(IActivityService.class);
bean1.sendGift();
}
}
|
基于schema的AOP支持(XML)
配置切面,切点表达式,通知
配置命名空间
1
2
3
4
5
6
7
8
9
| <?xml version="1.0" encoding="UTF-8"?>
<beans xmlns="http://www.springframework.org/schema/beans"
xmlns:xsi="http://www.w3.org/2001/XMLSchema-instance"
xmlns:aop="http://www.springframework.org/schema/aop"
xsi:schemaLocation="
http://www.springframework.org/schema/beans https://www.springframework.org/schema/beans/spring-beans.xsd
http://www.springframework.org/schema/aop https://www.springframework.org/schema/aop/spring-aop.xsd">
</beans>
|
1
2
3
4
5
6
7
8
9
10
11
12
13
14
15
16
17
18
19
20
21
22
23
24
25
| <?xml version="1.0" encoding="UTF-8"?>
<beans xmlns="http://www.springframework.org/schema/beans"
xmlns:xsi="http://www.w3.org/2001/XMLSchema-instance"
xmlns:aop="http://www.springframework.org/schema/aop"
xsi:schemaLocation="
http://www.springframework.org/schema/beans https://www.springframework.org/schema/beans/spring-beans.xsd
http://www.springframework.org/schema/aop https://www.springframework.org/schema/aop/spring-aop.xsd">
<aop:config>
<aop:aspect ref="aop">
<aop:pointcut id="pointcut" expression="execution(* com.along..*(..))"/>
<aop:before method="beforeAdvice" pointcut="execution(* com.along..*(..))"/>
<aop:after-returning method="afterReturningAdvice" pointcut-ref="pointcut"/>
<aop:after-throwing method="afterThrowAdvice" throwing="ex" pointcut-ref="pointcut"/>
<aop:after method="afterAdvice" pointcut-ref="pointcut"/>
<aop:around method="AroundAdvice" pointcut="execution(* com.along..*(..)) and args(money,..)"/>
</aop:aspect>
</aop:config>
<bean id="aop" class="com.along.aspecj.MyAop"/>
<bean id="orderService" class="com.ydlclass.service.impl.OrderService"/>
<bean id="userService" class="com.ydlclass.service.impl.UserService"/>
</beans>
|
Introduction
1
2
3
4
5
6
7
8
| <aop:aspect id="usageTrackerAspect" ref="usageTracking">
<aop:declare-parents
types-matching="com.xzy.myapp.service.*+"
implement-interface="com.xyz.myapp.service.tracking.UsageTracked"
default-impl="com.xyz.myapp.service.tracking.DefaultUsageTracked"/>
</aop:aspect>
|
MyAop
1
2
3
4
5
6
7
8
9
10
11
12
13
14
15
16
17
18
19
20
21
22
23
24
25
26
27
28
29
30
31
32
33
34
| public class MyAop {
private void beforeAdvice(JoinPoint jp) throws InvocationTargetException,
IllegalAccessException {
MethodSignature signature = (MethodSignature) jp.getSignature();
Method method = signature.getMethod();
method.invoke(jp.getTarget(), jp.getArgs());
System.out.println("this is before advice");
}
private void afterReturningAdvice() {
System.out.println("This is afterReturningAdvice");
}
private void afterAdvice() {
System.out.println("This is afterAdvice");
}
private void afterThrowAdvice(ArithmeticException ex) {
System.out.println("This is afterThrowAdvice");
System.out.println("----------" + ex);
}
private Object AroundAdvice(ProceedingJoinPoint pjp, Integer money) throws Throwable {
System.out.println("This is AroundAdvice1");
System.out.println("-----------" + money);
Object proceed = pjp.proceed();
System.out.println("This is AroundAdvice2");
return proceed;
}
}
|
选择使用哪种AOP声明风格
一旦您确定使用aop是实现给定需求的最佳方法,您如何决定是使用Spring AOP还是Aspect?是使用@AspectJ注解风格还是Spring XML风格?
如果您选择使用Spring AOP,那么您可以选择【@AspectJ或XML】样式。
XML样式可能是现有Spring用户最熟悉的,并且它是由真正的【pojo支持】(侵入性很低)的。 当使用AOP作为配置企业服务的工具时,XML可能是一个很好的选择(一个很好的理由是您【是否认为切入点表达式】 是需要【独立更改】的一部分配置)。使用XML样式,可以从配置中更清楚地看出系统中存在哪些切面。
XML样式有两个缺点。 首先,它没有将它所处理的需求的实现完全封装在一个地方。 其次,与@AspectJ风格相比,XML风格在它能表达的内容上稍微受到一些限制,不可能在XML中声明的命名切入点进行组合。 例如,在@AspectJ风格中,你可以写如下内容:
1
2
3
4
5
6
7
8
| @Pointcut("execution(* get*())")
public void propertyAccess() {}
@Pointcut("execution(org.xyz.Account+ *(..))")
public void operationReturningAnAccount() {}
@Pointcut("propertyAccess() && operationReturningAnAccount()")
public void accountPropertyAccess() {}
|
在XML样式中,可以声明前两个切入点:
1
2
3
4
5
| <aop:pointcut id="propertyAccess"
expression="execution(* get*())"/>
<aop:pointcut id="operationReturningAnAccount"
expression="execution(org.xyz.Account+ *(..))"/>
|
XML方法的缺点是不能通过组合这些定义来定义“accountPropertyAccess”切入点。
@AspectJ还有一个优点,即@AspectJ切面可以被Spring AOP和AspectJ理解(从而被使用)。 因此,如果您以后决定需要AspectJ的功能来实现额外的需求,您可以轻松地迁移到经典的AspectJ当中。
总的来说,Spring团队更喜欢自定义切面的@AspectJ风格,而不是简单的企业服务配置。
以编程方式创建@AspectJ代理
除了通过使用<aop:config> 或<aop:aspectj-autoproxy>在配置中声明方面之外,还可以通过编程方式创建通知目标对象的代理。
代码如下,这只是一个小例子,用来看一下spring是怎么封装代理的:
1
2
3
4
5
6
7
8
9
| public class MyTest {
public static void main(String[] args) {
AspectJProxyFactory aspectJProxyFactory = new AspectJProxyFactory(new OrderService());
aspectJProxyFactory.addAspect(MyAspect.class);
IOrderService proxy =
(IOrderService) aspectJProxyFactory.getProxy();
proxy.order(111);
}
}
|
Spring事务(编写中)